Installing a glass shower can instantly transform a bathroom, making it look brighter, cleaner, and more open. But even small mistakes during installation can cause problems that are expensive to fix later. Understanding where things often go wrong helps us plan better, avoid frustration, and make sure the finished space feels balanced, functional, and safe.
Measuring Without Accounting for Real-World Variables
Every wall looks straight until we place a level against it. One of the biggest errors in glass shower installation happens before the glass even arrives: inaccurate measurements. Walls and floors in most homes are rarely perfect, even in new builds. A difference of a few millimeters in angle or height can cause gaps, misalignment, or uneven door swing.
We always measure multiple times from different points. It’s not enough to take height and width at one location. We measure top, middle, and bottom on each side, along with diagonal checks. Corners are inspected for squareness, and we check that the floor slopes toward the drain. This ensures proper fit and prevents leaks.
Many homeowners overlook the importance of these details and trust their initial measurements. That mistake often leads to reordering panels, longer delays, and higher costs. For a perfectly fitted Calgary custom shower, the key is measuring based on reality, not assumption.
Ignoring Structural Support Behind the Walls
A glass shower enclosure looks light and delicate, but each panel carries substantial weight. The wall anchors, hinges, and brackets need to grip something solid. If the shower walls lack proper reinforcement behind the tile, the glass can shift, loosen, or even crack over time.
We always confirm whether there’s blocking behind the tile before drilling. When possible, we recommend adding wood backing during renovation or before tile installation. Anchoring into drywall alone isn’t enough. Proper support makes a big difference in long-term stability and safety, especially for frameless designs where the glass itself carries most of the load.
If you’re planning a remodel, it’s worth asking your contractor about the backing before the walls are sealed. Reinforcing early can prevent major complications later.
Overlooking the Importance of Level and Plumb Alignment
Even when measurements are precise, the actual installation can go wrong if the panels aren’t perfectly level and plumb. This small misalignment affects how the door swings and seals, and it often shows up as uneven gaps.
One common cause is rushing through leveling checks. Sometimes, installers align to the floor rather than the actual plane of the wall. But floors often slope slightly toward the drain, so using them as a reference creates visual imbalance.
We use digital levels and shims to ensure each glass panel aligns correctly, even when the room isn’t perfectly square. This attention ensures that doors close smoothly, seals compress evenly, and no side bears extra stress.
A simple tip for homeowners: stand at a distance and look for parallel lines between glass edges and tiles. Uneven reflections often reveal alignment problems before they become functional issues.
Installing Without Considering Movement and Expansion
Glass may look rigid, but temperature changes and humidity affect it more than most realize. Metal fittings also expand and contract slightly. A tight fit that feels perfect on installation day may later crack the glass or strain the hinges.
We always leave a controlled tolerance around the glass edges, allowing for natural expansion. Silicone joints and flexible seals fill the small gaps while keeping the enclosure watertight. The glass remains free to expand slightly without pressure.
This is one of the most misunderstood details in residential installations. A “tight fit” seems ideal but can cause long-term issues. Leaving small, invisible allowances is what keeps a glass shower performing smoothly through seasonal changes.
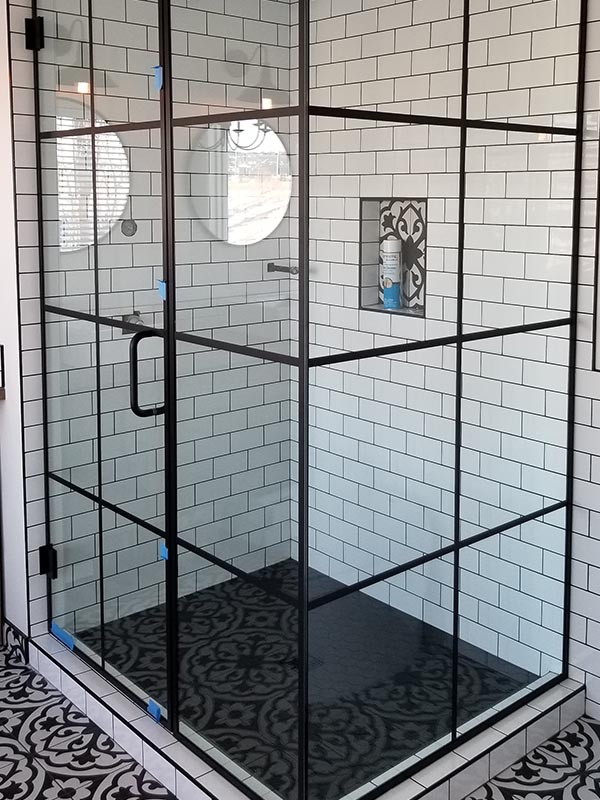
Using the Wrong Hardware or Sealants
Every component of a glass shower plays a role. Hinges, handles, clips, and seals must match the glass thickness and enclosure style. Using mismatched hardware is a frequent mistake, especially when mixing parts from different suppliers.
We always confirm hardware compatibility before ordering glass. The hinge cutouts, for example, must match the exact model and type. Using the wrong silicone sealant can also lead to staining or peeling. Only non-acidic, neutral-cure silicone should be used near glass and metal.
Another overlooked point is hardware material. Cheap fittings may look similar but corrode quickly in a wet environment. Investing in solid brass or stainless steel ensures longevity and a consistent look.
Poor Drainage and Water Containment Planning
Even a perfectly installed glass enclosure will leak if the layout doesn’t direct water correctly. The slope of the floor, placement of the drain, and position of the showerhead all influence how much water collects at the base or escapes through the opening.
A common mistake is designing a door that opens directly toward a low spot or where water naturally flows. Frameless showers are especially sensitive because they rely on tight seals and gentle slopes rather than frames.
We evaluate water flow before any glass is installed. The sill should tilt slightly toward the shower interior, and the door should swing outward without collecting puddles beneath it. Small design changes early prevent constant cleanup later.
Misjudging the Door Swing Direction
Swing direction affects not only comfort but also safety. If a glass door opens the wrong way, it can hit nearby fixtures or block access. In bathrooms with tight layouts, this becomes a major issue.
We always test the swing clearance in both directions before drilling. Most codes require shower doors to open outward for safety, but some layouts allow dual-swing hinges. The key is ensuring the door doesn’t interfere with vanities, toilets, or towel racks.
When planning, visualize the full range of motion. Try opening an imaginary door before finalizing your design. This small step helps prevent costly changes once glass is ordered.
Cutting Costs on Glass Quality
Tempered safety glass is required by code for shower enclosures, but not all tempered glass is the same. Low-quality panels may have uneven edges, inconsistent tempering, or internal stress that makes them more likely to crack during installation or over time.
We always use certified, precision-cut glass panels. The clarity, strength, and consistency make a difference you can see and feel. Thicker glass, typically 10 mm or 12 mm, offers more stability for frameless enclosures, while thinner panels work well with framed designs.
Choosing cheaper glass often saves a little initially but increases the risk of problems that are much more expensive to fix. The best installations always start with reliable materials.
Neglecting Silicone Curing and Final Inspection
After the glass is installed, many people rush to start using the shower. However, silicone sealant requires time to cure properly—usually 24 to 48 hours depending on humidity and temperature. Using the shower too soon can break the seal, leading to leaks and mold growth behind the glass.
We always allow a full cure before any water contact. During the final inspection, we check every seal line, hinge operation, and level once more. Taking time at this stage ensures a professional finish that lasts for years.
If you notice bubbles or gaps in the silicone line after curing, it’s best to reseal immediately. Small imperfections grow quickly when exposed to constant moisture.
Forgetting About Maintenance After Installation
A well-installed glass shower stays beautiful only with regular care. Hard water spots, soap residue, and mineral buildup can dull the glass and damage seals. Skipping simple maintenance eventually shortens the enclosure’s lifespan.
We recommend wiping down the glass after each use with a microfiber cloth or squeegee. Avoid harsh chemical cleaners, especially those with ammonia, which can harm silicone seals. Regular cleaning maintains the clarity and helps you notice early signs of wear or leaks.
For joints and hinges, a gentle inspection every few months ensures nothing loosens or corrodes. Tightening small screws early prevents large adjustments later.
When to Seek Professional Help
Sometimes, even a careful homeowner encounters an issue that requires specialized tools or experience. If your door rubs, leaks, or feels unstable, professional assessment is safer than guessing. Minor misalignment can usually be corrected without full removal.
For comprehensive insight into layout, measurements, or hardware selection, explore Calgary custom shower options and designs that balance style with precision. When you’re ready to move forward or have technical questions about your setup, you can always contact us for professional guidance.
FAQ
How long does a typical glass shower installation take?
Most installations take one to two days once the glass panels are ready. Preparation, measurement, and silicone curing add a few extra days before the shower is usable.
What type of glass is best for a frameless shower?
Tempered safety glass, at least 10 mm thick, is ideal for frameless enclosures. It offers both strength and visual clarity without requiring a bulky frame.
Can a glass shower door swing both in and out?
Yes, many hinges allow dual-swing operation. However, the bathroom layout must have enough clearance, and outward swing remains a safety requirement in most regions.
What should I do if my shower door starts squeaking or sticking?
Clean and inspect the hinges first. If the problem persists, lightly lubricate with silicone spray or check for loose screws. Persistent friction may indicate alignment issues.
Is it normal to see small gaps between panels?
Yes, small gaps are intentional to allow movement and prevent stress. These are sealed with clear silicone or flexible seals to keep water from escaping.